
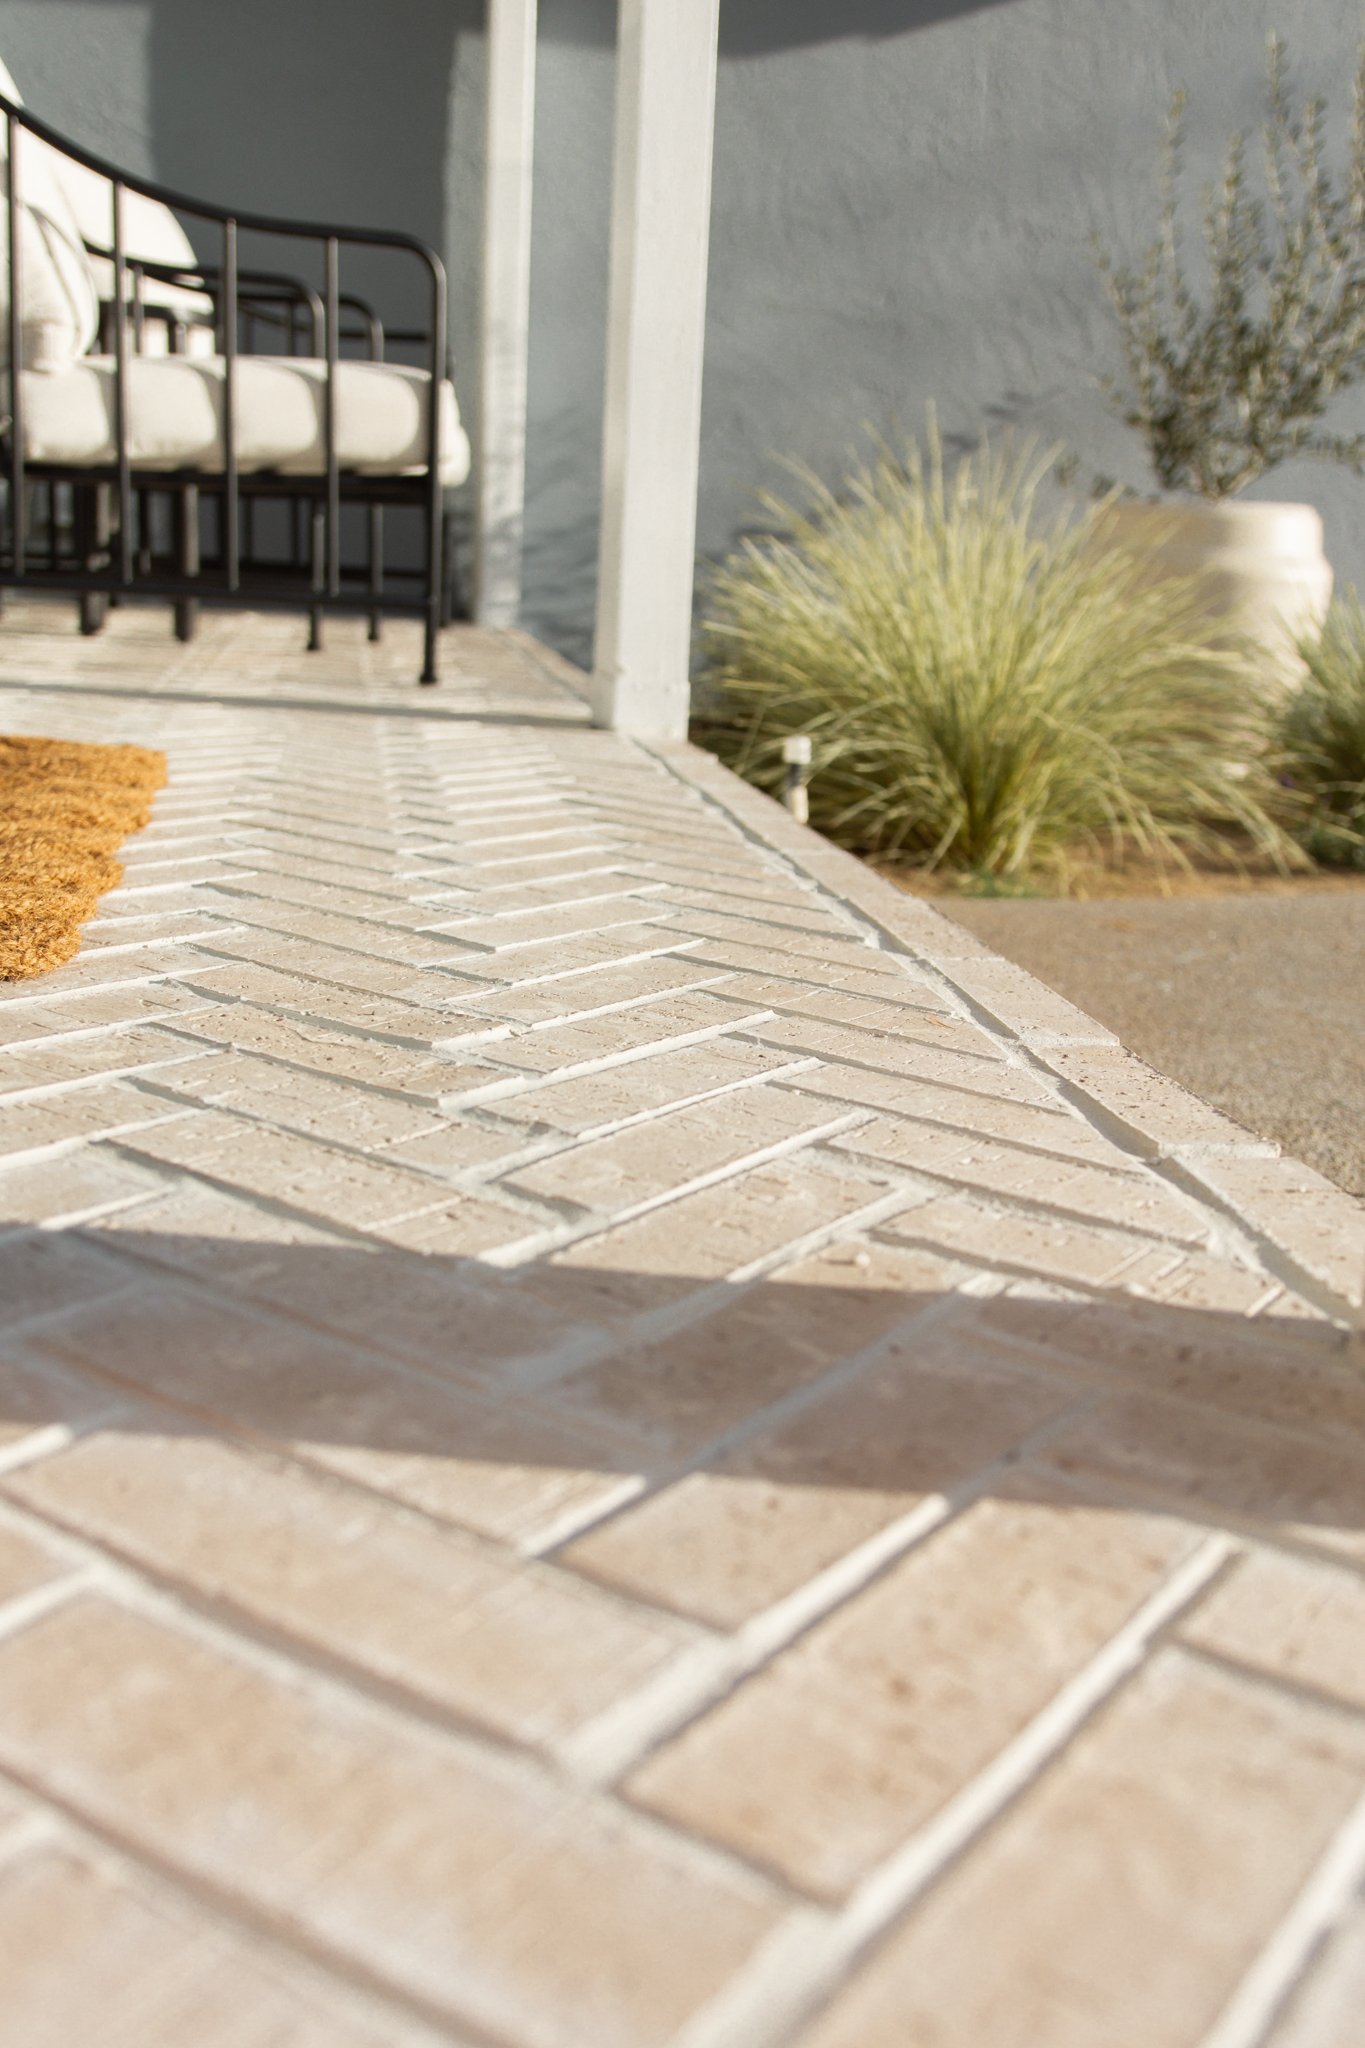
Herringbone Brick Front Porch

Old Mill Brick kindly gifted this product for this project. All thoughts and opinions are 100% my own!
Some of the best reveals take time, and that was certainly the case with our herringbone brick front porch! The project as a whole was a labor of love (and genuine hard work!) and I couldn’t be happier with the final results. In this post I’ll dive into the prep work, a review of Old Mill Brick, and share exactly what we did to achieve the final look shared in this post.

before

after
The Backstory on our Porch
Before jumping into the tutorial for how we laid the Old Mill Brick, I’ll need to share what work we did to get our porch ready for the brick webbing. A bit of back story on our home. Our home was built in the 1960s on a raised foundation. A concrete front porch runs along the front portion from the living room to the kitchen. It isn’t a huge space, but it is large enough to have a patio seating area (which you’ll see soon!) When we first purchased the home in 2020, there was a chair railing, a large birdbath, and some bushy overgrown plants that we’re taking away from the home’s curb appeal.
So after some minor landscaping changes and removing the porch railing, we were able to open up the house. The overall condition of the concrete slab was in excellent condition. The main issue here was the amount, and I mean LAYERS, of paint that had been applied to the porch over the last 60-years. When I tell you it took us weeks to remove it, I’m not kidding. We tried several safe removers but ultimately found that the best paint strippers were the heavy-duty kind. We also saw great success when a friend lent us a paint stripper designed for graffiti.
So you may ask, “why didn’t you just apply the brick webbing directly onto the painted porch.” The main issue here was that the paint was peeling in several places, and I’m almost positive the paint applied prior to us moving in wasn’t made to adhere to concrete. As a general rule it just wouldn’t be a good idea to spend the time and money of installing brick onto or peeling paint just to have it not adhere right. SO, this was where we found ourselves - after weeks of scrubbing and removing paint, it was finally ready for the brick webbing!


How to Apply Old Mill Brick Webbing
First things first, measure the square footage of the area you’re looking to apply brick webbing. From here, you can utilize Old Mill Brick’s materials calculator to see how many boxes you’ll need to complete your project. To be safe, I recommend having a few extra sheets if you break a brick during the application.
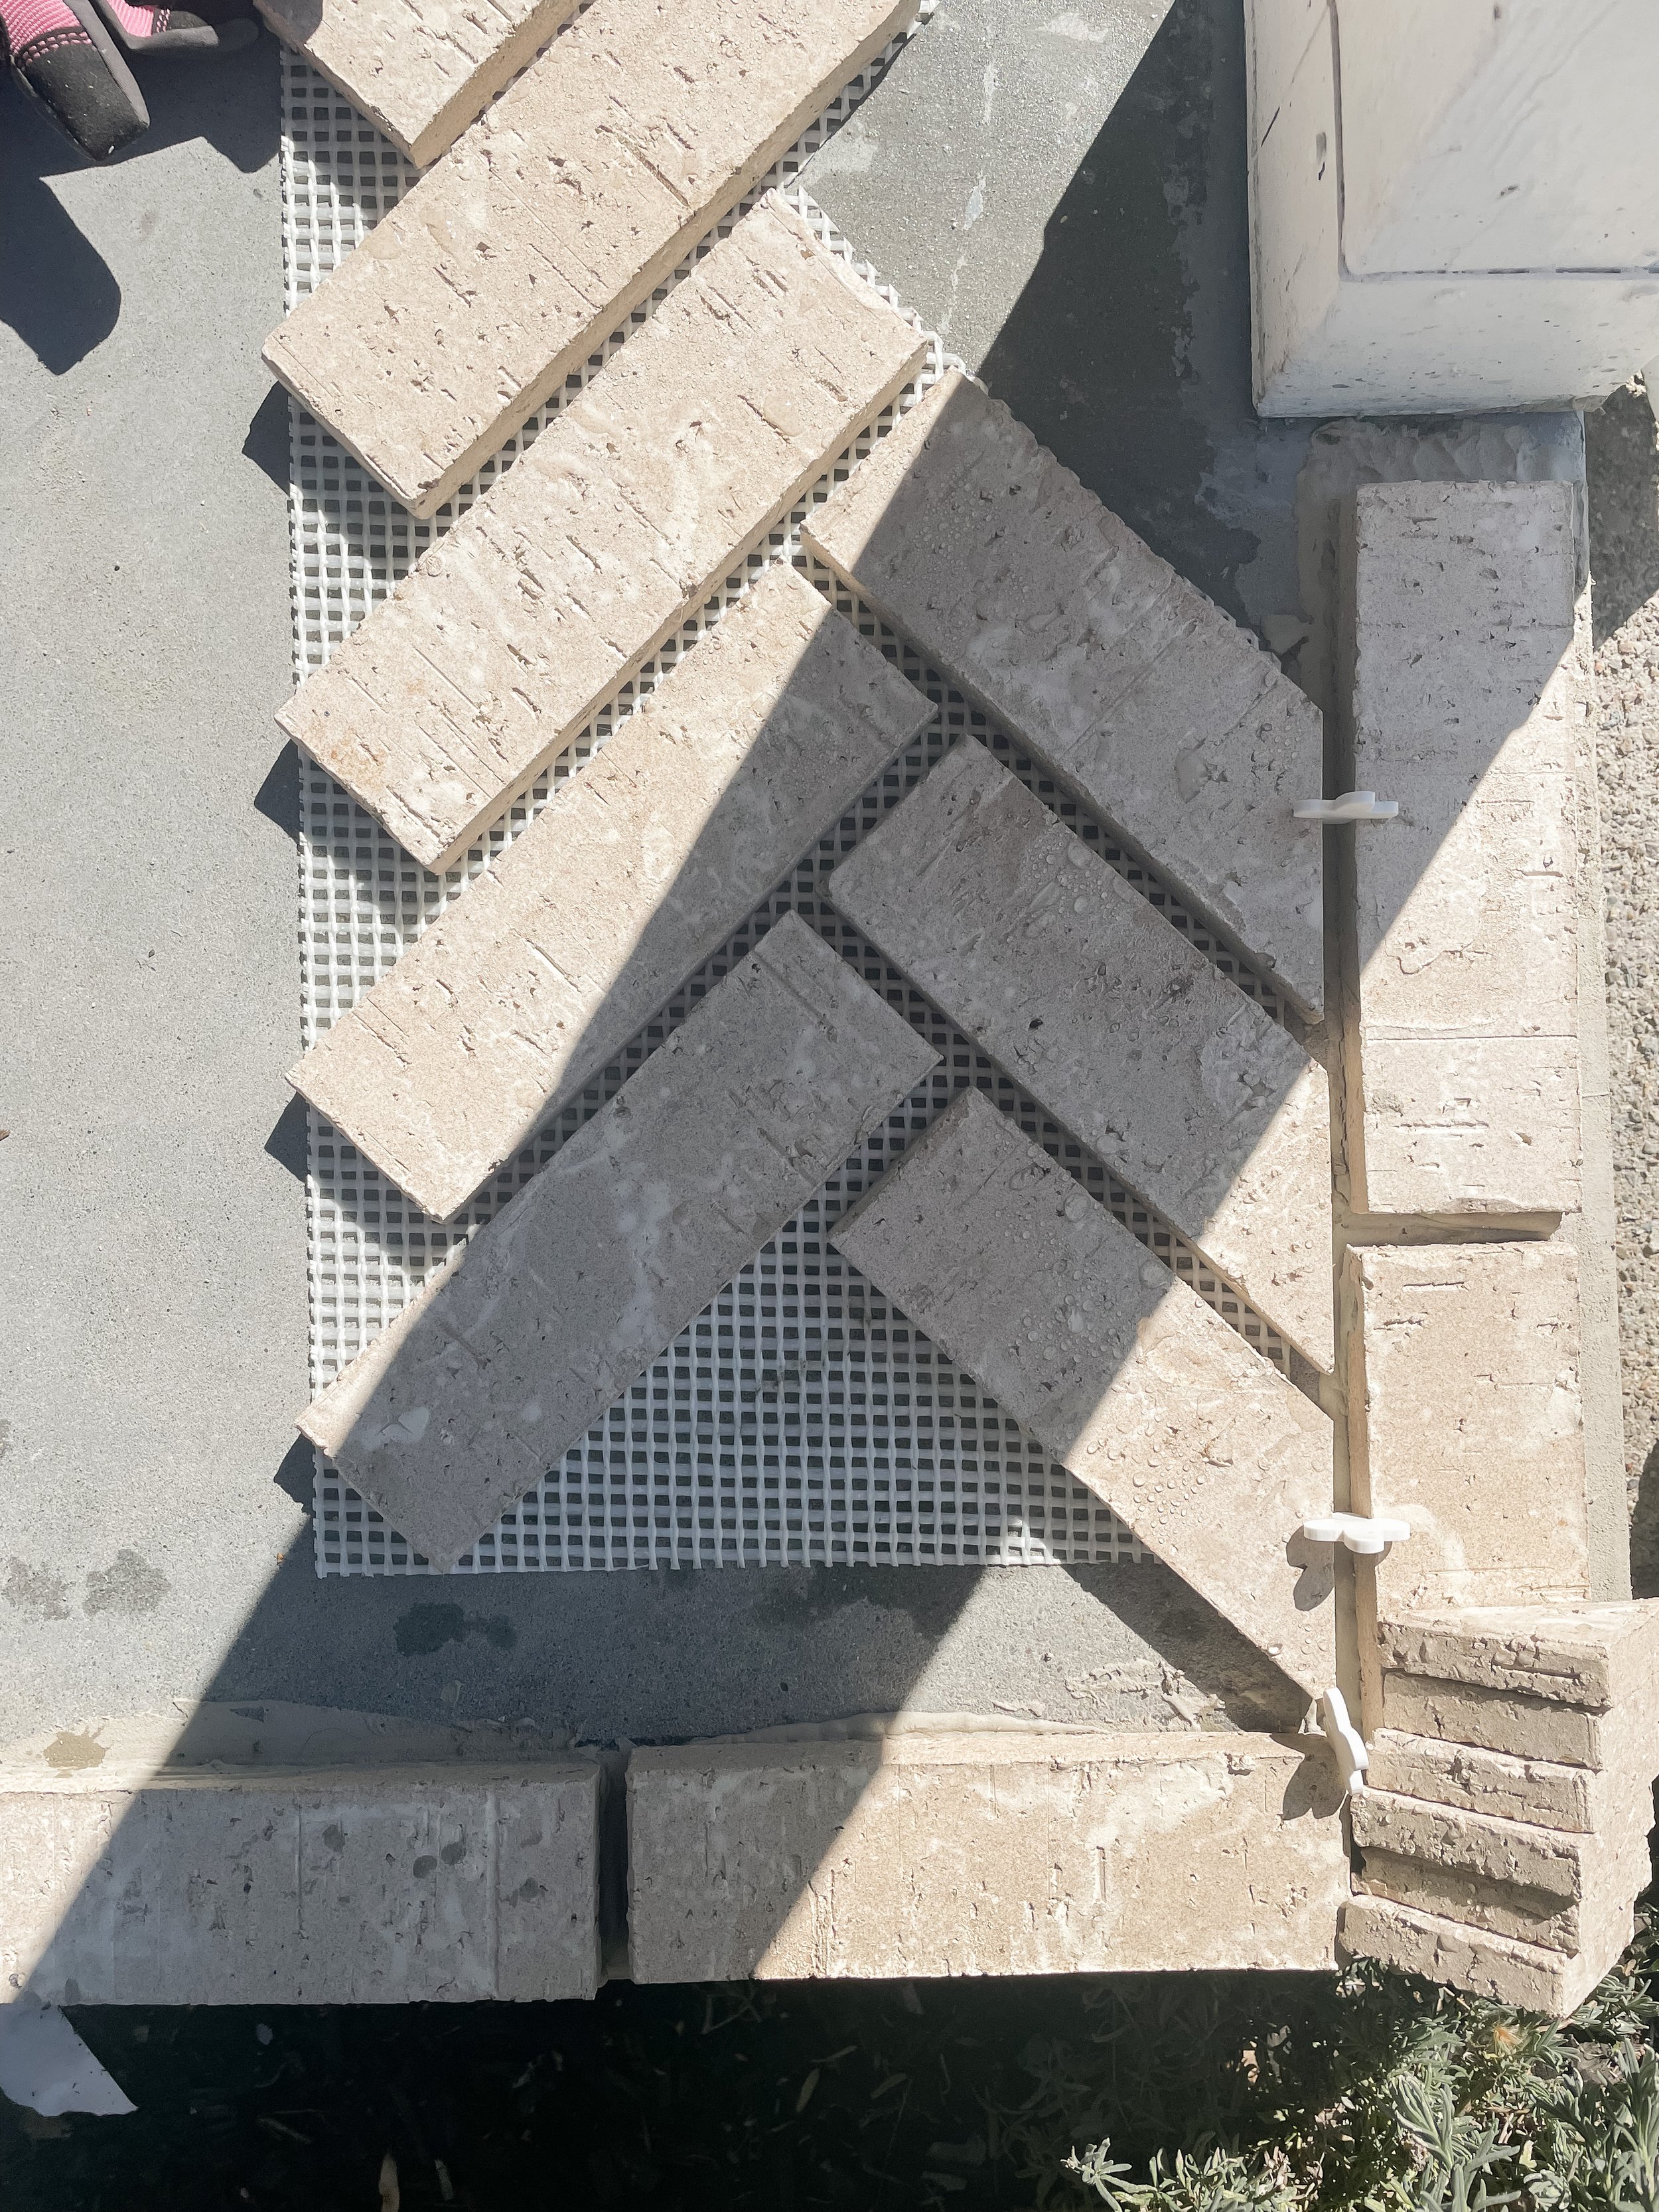
Once your bricks are received, start by making a dry application with your bricks, i.e., laying them out in the direction or design of your choice. For example, we decided on a single brick border with the herringbone thin brick Webb inside. Laying out the bricks allowed us to visualize what the design would look like while also noting what bricks would need to be cut.
To set our border in line and create equidistance for our Brick Webb to fit, we created a straight border using a level and tape measure. Then, use a pencil to mark out your lines or edges.
Next, you can start the application process for your border or corner. Using the penciled line as a guide, I applied thin set with a notched trowel. I used a 3/8 rubber tile spacer between each brick to keep consistent with that of the Brick Webb sheets.
I then waited 24 hours to let that set before removing the spacers and moving onto the Brick Webb. Starting the far corner of the porch, I laid out three rolls of Brick Webb sheets. First, making note of any cuts (for the porch pillars). Next, I worked in these smaller manageable sections to apply the thin set towel and place the Brick Webb sheet on top. You’ll want to see the thin set come between the webbing. If not, try lightly tapping the sheets with a rubber mallet to encourage them to sit.
I periodically placed the level across the brick to ensure the application was level. Therefore, if you have any high spots, use the mallet to tap the area down lightly.
For this project, I utilized a wet tile saw. My dad rented one at Home Depot for the day, which came out to about $75, which was well worth the ease and precision of the cuts. When I initially did the dry plan, we found out that we could use the cuttings to the other side of the pattern, which utilized every bit of the brick.
The application of the brick took us about a day and a half. We most likely could have completed the application in a day, but I needed to purchase an additional bag of adhesive! (note to self to double-check material coverage)


How to Get a Clean Brick Application
Now, I know this won’t apply to everyone, but when I was first researching Brick Webbing, I noticed a TON of tutorials on applying grout then using a german smear technique or white-washing the brick. I ideally wanted the grout lines to be very clean, with little to no excess grout on the brick. To do this, I found out that your first must seal the bricks before applying your grout. Sealing your bricks will prevent an unintentional white-washing from the grout and keep the bricks looking uniform and clean.
I used Miracle Sealants 511 Impregnator, which runs for $17 and is available at most hardware stores. The coverage of this product is significant and, for my project, was more than enough to seal my bricks before and after grout application. The application of Miracle Sealant is straightforward and is a must if you prefer this look or don’t want your bricks to become stained by the grout.
how to grout brick webbing
Once the sealant was set (we gave 24 hrs), I began the process of grouting. For this project, I used Sanded Grout from Polyblend in the shade Snow White (#11). It’s an excellent warm complement to the Bristol White Brick Webb! Mix your grout according to your bag’s instructions. For this particular grout, it’s crucial to pay close attention to the water measurement!
Once mixed, you’ll want to let your grout sit for 10 mins. I utilized a grout bag, which is very similar to a pastry bag and essentially works the same way. To use, wrap your hand around the front opening of the grout bag as if you were holding an ice cream cone. Then fold your bag down over your hand at around halfway. Next, scoop your grout from your container into your bag. I started with a little less than 1/2 full bags. Next, twist the top of the bag in one direction and the bottom in the other. Finally, bounce the grout bag on the side of the container hitting the side to release any air bubble which may have formed.
To grout, start in the furthest corner and begin to work your way back, making sure to only grout in small sections. When grouting, hold the bag at a 45-degree angle and make sure the grout is pushed between the brick and not just on the surface. Let sit for 10-15 mins and press the grout into the seams using a jointer tool or your finger (if so, use gloves!) Any excess will push off or can be used to fill any crevices that didn’t receive enough grout.
Continue this process working in the same grouting, waiting, tooling, and repeating system. From here, let your grout sit and set for 24hrs without foot traffic.
Once the grout is dry, follow up with an additional sealant layer over the brick and grout. This will give your herringbone brick Webb another barrier of protection!

If I can offer one piece of advice to those interested in tackling this project, it’s not to second guess yourself. The application process couldn’t have been more straightforward, especially for someone like me who has NEVER worked with brick, tile, etc. The parts that seemed tricky - like operating the tile saw were very straightforward, thanks to a bit of coaching from my dad (thanks, Pa). Overall the most challenging part of this process was the prep work, so I hope I've convinced you to start your own Old Mill Brick Project!
The next step in the porch project will be covering the painted beams and later this summer painting our house! Stay connected on Instagram if you’d like to follow our porch makeover progress :)
This post contains affiliate links. If you use these links to buy something we may earn a commission. Thank you for your support!


