
Our Next Home Project - Evie’s new room

We’re officially kicking off our first home project of 2021! It feels like we just wrapped up our last project in the dining room (seen here), but just like that, we’re onto the next. This room wasn’t exactly planned. We had originally planned to finish up the design in Evie’s room later in the year but, thanks to our spur the moment idea, we’re tackling it now. Basically, we ended up realizing that keeping Evie in her current room just wasn’t a good idea long term. In this project, we’ll be swapping her room for the office/guest room. We hadn’t done too much to either space, so we lucked out in that regard.
Since we hadn’t anticipated redoing her room so quickly, we’ll be breaking up projects into three separate phases. The first will focus on cosmetics changes, with new paint, beadboard, and trim. We will tackle the built-in storage for books and toys while also adding a window seat in the second phase in late January-early February. The last phase will be focused on a quick flip of the current closet, which is currently lacking any real function.
PHASE 1 - Toddler room inspiration & design
Our first phase of this project will be tackling the paint, beadboard, and trim. These things are relatively cost-friendly and can be completed over a weekend. We’re basing much of our color palette around a rug I purchased for her room last year. Blush, sage, and deep green tones will be our target, along with natural materials like linen and rattan. With this in mind, we decided to go with Jojoba by Behr in matte. The color was the truest shade of “light sage” that we could find and pairs really well with our color palette.
Since we’re adding beadboard and trim to the walls, we only had to paint 3/4 of the upper wall, which with two of us took a few hours. One thing we found during painting was that 2-coats of paint was definitely the way to go.


PHASE 2 - Toddler toy storage Built-ins & layout
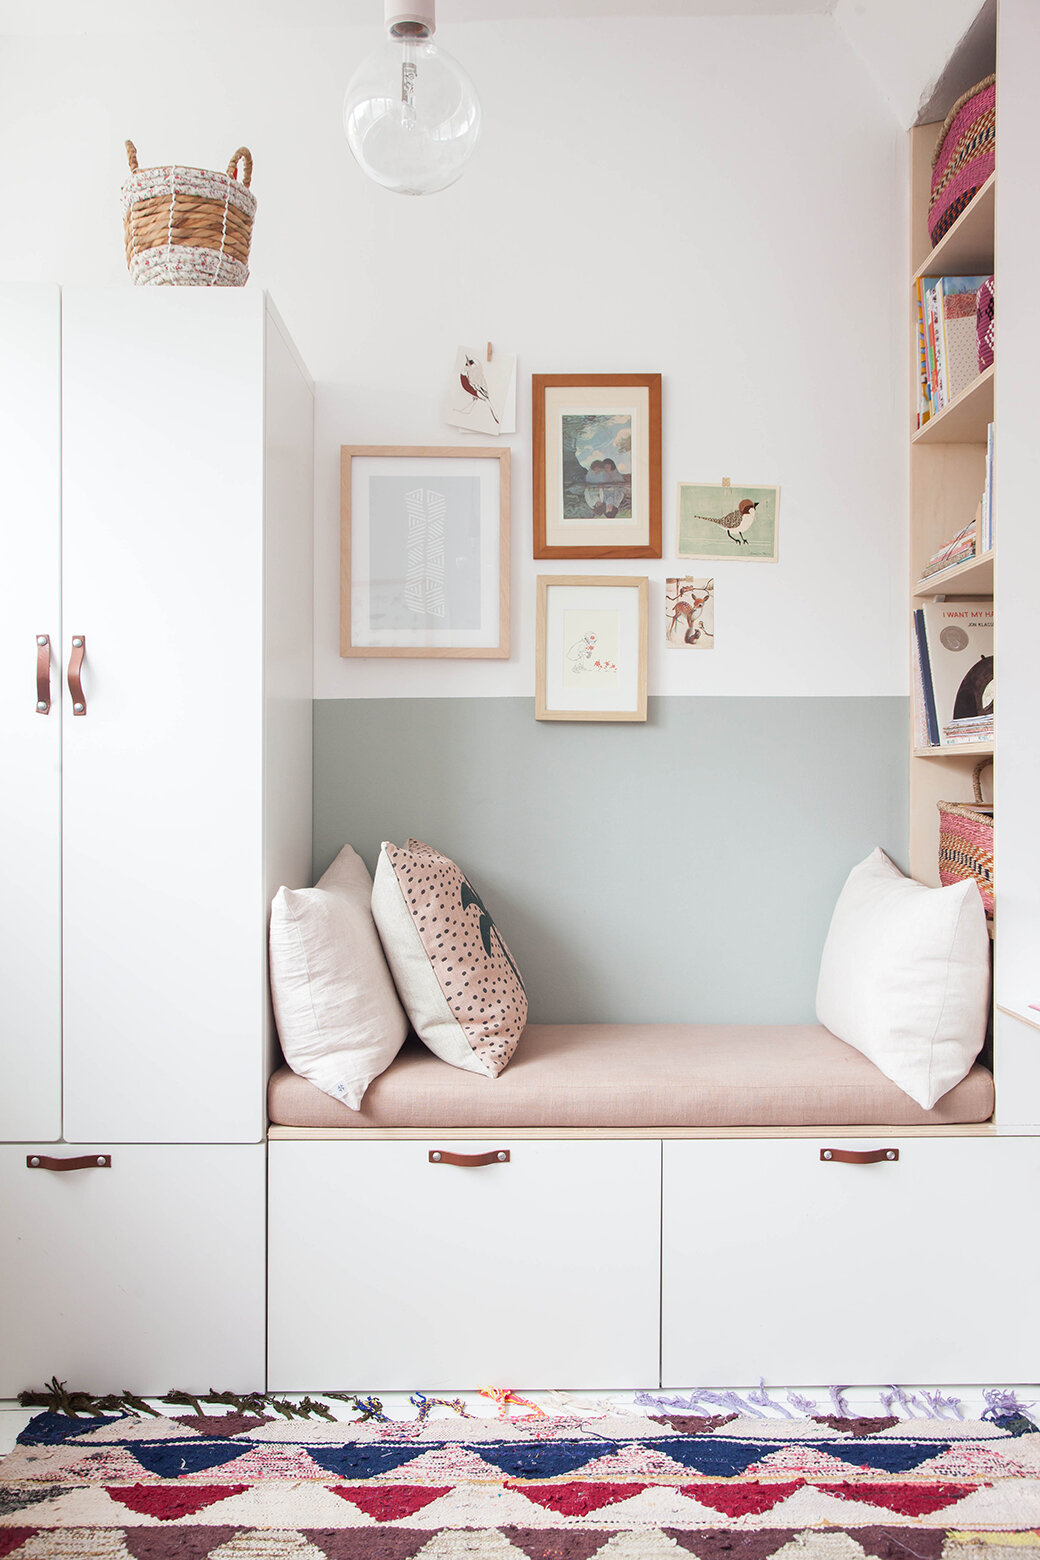
One of the biggest challenges I faced when mapping out her room was figuring out how to create a fun, toddler-friendly space that would work as she grew up. As I mentioned, her current room is fine, but the overall layout is much narrower, so having the adjusted floor plans will help with this. Looking ahead to when she moves from a crib to a big kid bed space should transition with this. Keeping this in mind, I think making this swap was a good idea. Furthermore, we’ll be moving her to the back of the house, MUCH quieter than the front room.
One of the biggest sources of inspiration was this room designed by the folks over at Mint & Pine. Their idea for creating these built-ins to surround the window was genius and their design turned out beautifully. Our goal is to take this vision and create a similar system in Evie’s room for additional toy and book storage. Rather than using baskets, I will be adding doors to the outward-facing cubbies. In this phase of the design, we’ll also be turning to Ikea for the built-ins. I guess you could say our aim is to hack the basic configuration with a few structural changes to ensure everything aligns.

Image By: Mint & Pine

Image By: Shades of Blue Interiors
PHASE 3 - A FUNCTIONAL CLOSET
As Evie gets older, she will want to start dressing more. I love the idea of letting her play and pick her own clothing. To keep her closet open and accessible, we removed the sliding doors. I’m still not sure why builders add these on such tiny closets; it seems counterproductive. Anyways, these have come off, and we’ll be adding these velvet curtains inside the trim as we did in her current room (seen here). We’ll be removing the current dresser and swapping it for a series of Ikea TROFAST storage towers. These are great for kids and easily accessible, not to mention no more smashed fingers! I plan to arrange them similar to the Hydrangea Tree House closet Ikea hack. I’ll label the bins for easy identification, and they should hold up fine since children’s clothing is so light.
I’m still trying to figure out a creative storage solution for her shoes but will most likely allot one of the larger bottom bins to sneakers and sandals. For Hanging storage, we’ll keep a traditional sturdy rod (perhaps gold or brass) and keep the top shelving for additional seasonal clothing, humidifier, etc. As far as cosmetic changes, I plan to paint the closest the same Jojoba sage green and utilize the palm wallpaper I purchased last year. With any project we do, I always try to use things we already own!


